 Inference
 Marketplace


Introduction
This procedure explains how to configure 802.1x port-based network access control (PNAC) on nodes managed by Edge Infrastructure Services. You will create a certificate enrollment profile that defines how EVE-OS (Edge Virtualization Engine) obtains and renews device certificates via SCEP, attach that profile to a project, and mark the appropriate network adapters as 802.1x-eligible. Complete these steps before deploying nodes into enterprise network environments that require certificate-based port authentication. For background on how 802.1x and SCEP work in EVE-OS, see 802.1x Port-Based Network Access Control Overview.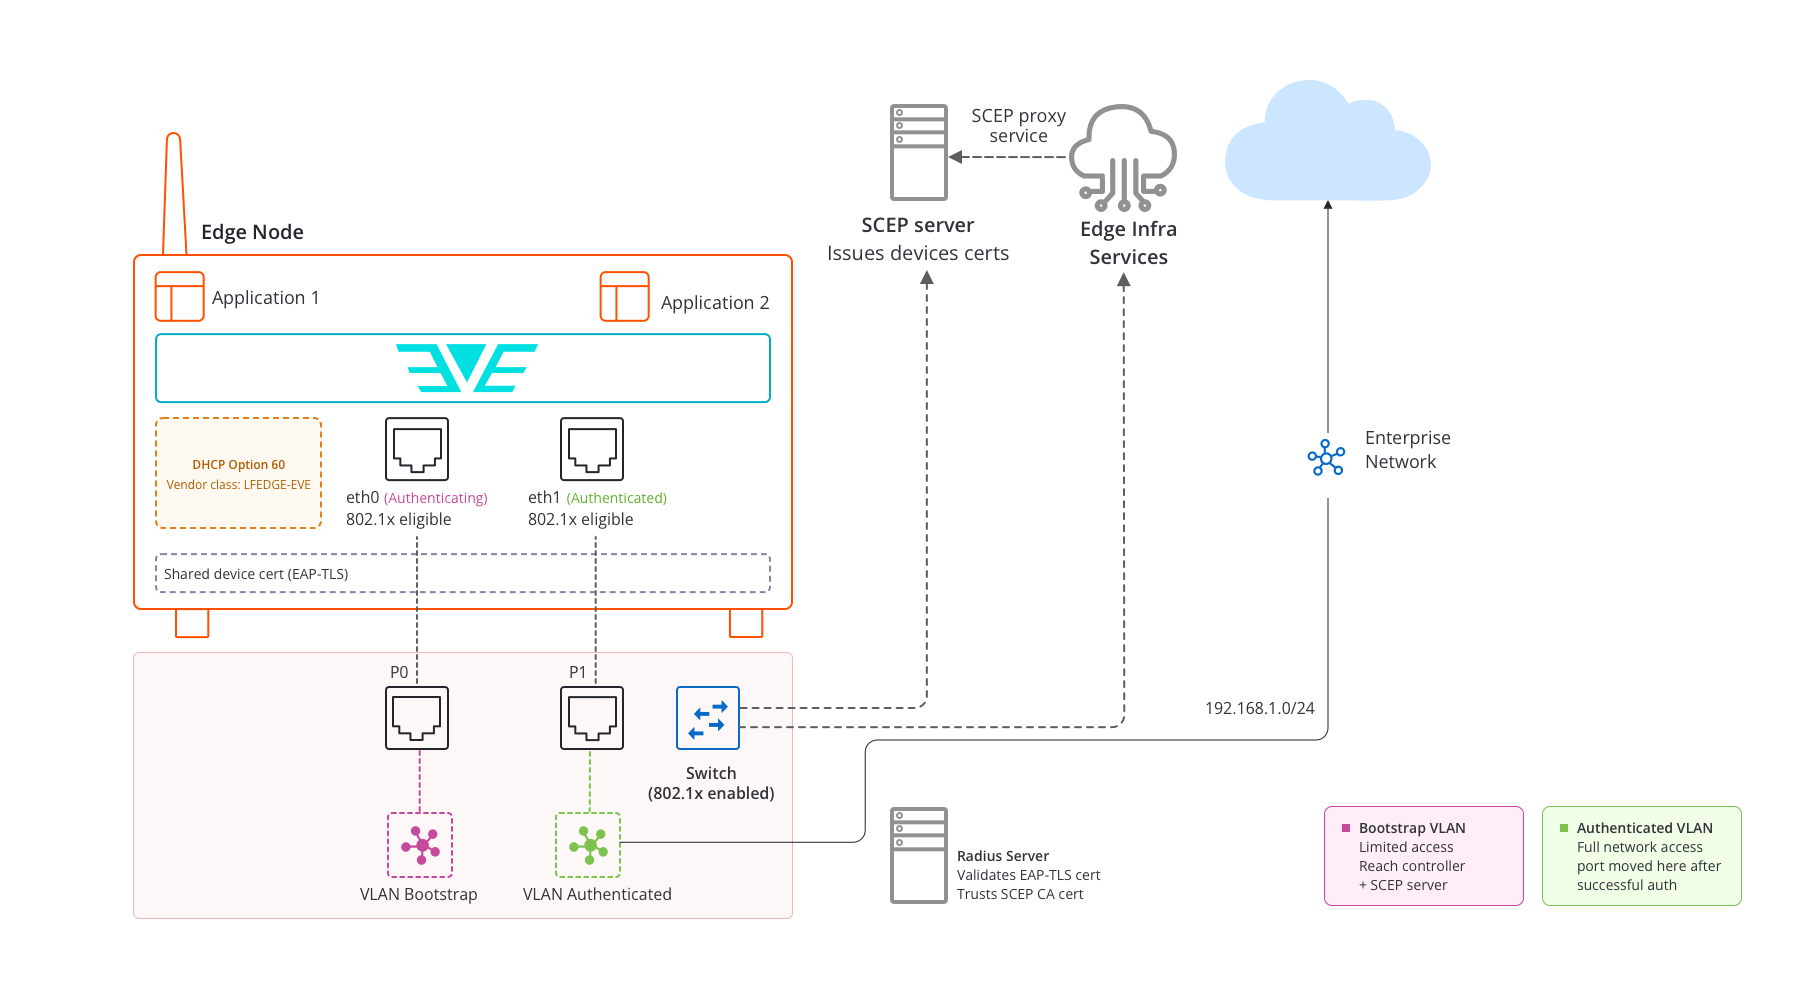
Prerequisites
- You have the SysManager or SysAdmin role in your enterprise. See Manage Roles.
- A SCEP-compatible Certificate Authority (CA) accessible either directly from the node’s bootstrap VLAN or from Edge Infrastructure Services (via the controller SCEP proxy). You need the SCEP server URL and a challenge password.
- CA certificate bundle in PEM format (root CA and any required intermediate CAs), ready for upload.
- A project where you will add the 802.1x policy. Create the project before continuing if it does not exist.
- Nodes running EVE-OS 14.5.0-LTS or later.
Prepare Your Network Equipment
Configure the network switch
The switch connected to your node ports must be a managed switch with IEEE 802.1x support. Configure the following on each port that will connect to an EVE-OS node: Enable 802.1x port authentication. Enable IEEE 802.1x on each switch port and configure a RADIUS server as the authentication backend. The RADIUS server must be configured to validate EAP-TLS client certificates. Configure two VLANs. The switch requires two VLANs to support the certificate bootstrapping flow:- Bootstrap VLAN (also called a guest or auth-fail VLAN): Provides limited network access. The node must be able to reach Edge Infrastructure Services and the SCEP server from this VLAN. The switch assigns this VLAN to the port when the device is not yet authenticated.
- Authenticated VLAN: Provides full network access. The switch moves the port to this VLAN after a successful 802.1x authentication.
Configure the SCEP server
Configure the following on your SCEP server:- A CA certificate and private key for signing enrolled device certificates.
- A challenge password (shared secret) that devices use to authenticate their enrollment requests.
- The CA certificate used by the SCEP server must also be configured in the RADIUS server’s EAP-TLS settings as a trusted CA for client certificate validation.
Create a Certificate Enrollment Profile
A certificate enrollment profile defines the connection to your SCEP server and the certificate attributes EVE-OS uses when requesting device certificates. You create this profile once and attach it to one or more projects.- In the header, click your profile avatar.
- Click Enterprise Settings.
- Click the Security tab.
- Click the Device & Network Trust sub-tab.
- In the Certificate Enrollment Profiles section, click the Create Profile button.
Configure identity
- In the Name field, enter a unique identifier for the profile. The name cannot contain spaces.
- In the Display Title field, enter a human-readable label for the profile.
- In the Description field, enter an optional description.
Configure SCEP
- In the SCEP URL field, enter the full URL of your SCEP server endpoint (for example,
https://scep.example.com/sceporhttps://scep.example.com:8080/scep). - In the Challenge Password field, enter the pre-shared challenge password configured on your SCEP server.
- Enable the Use controller proxy toggle if your SCEP server is not directly reachable from the bootstrap VLAN. When enabled, Edge Infrastructure Services relays SCEP requests to the server on behalf of the node.
Configure the certificate authority
- In the Certificate Authority section, paste your CA certificate chain in PEM format, or click Upload PEM and select the file. Upload the root CA and all required intermediate CAs.
Configure the CSR profile
The CSR profile section defines the certificate subject. Edge Infrastructure Services supports dynamic variable substitution so that every device receives a unique certificate. For the full list of supported system variables, see Custom Configuration for Applications.- In the Common Name Template field, enter a value or variable:
- To use the node’s system-generated ID:
$zri.system.edge-node.id - To use the node’s name:
$zri.system.edge-node.name - To use the hardware serial number:
$zri.system.edge-node.serial
- To use the node’s system-generated ID:
- Optionally, complete the Organization, Organizational Unit, Country, State, and Locality fields.
- In the SAN URI field, enter a URI value or variable, for example
URN:Serial:$zri.system.edge-node.serial. - Optionally, enter a SAN Email if your CA policy requires one.
Configure key and renewal settings
- Under Key Family, RSA is the supported key family for this release.
- Select the RSA Key Size from the dropdown.
- Select the Hash Algorithm from the dropdown.
- In the Renewal Period (%) field, enter a percentage. Edge Infrastructure Services starts renewing the certificate after this percentage of its validity period has elapsed. For example, entering 50 triggers renewal when 50% of the certificate’s lifetime has passed. Coordinate this value with your CA administrator based on certificate validity length and expected device offline periods.
- Click Create Profile.
Enable 802.1x in the Project Node Policy
On a new project
The Policies step is available for Standard and Deployment project types. Azure IoT projects do not include a Policies step; use the existing project flow instead.- Open Infrastructure > Fleet > Projects.
- Click the Add button (floating button in the lower right of the page).
- Select Standard or Deployment as the project type.
- Complete the Identity step and click Next.
- On the Policies step, locate the Node Policy card and enable its toggle.
- Inside the Node Policy card, toggle on 802.1X Port-Based Network Access Control.
- The EAP Method field shows TLS and cannot be changed. TLS is the only supported method for this release.
- In the EAP Identity field, enter an optional identity string to send during the EAP handshake. If left blank, EVE-OS uses the device certificate identity.
- From the Certificate Enrollment Profile dropdown, select the profile you created.
- Click Next to proceed to the Review step, then click Create Project.
On an existing project
- Open Infrastructure > Fleet > Projects.
- Click the name of the project you want to configure.
- Click the Configure (gear) button in the upper right of the page.
- Click the Policies tab.
- Click Node Policy.
- Toggle on 802.1X Port-Based Network Access Control.
- The EAP Method field shows TLS and cannot be changed. TLS is the only supported method for this release.
- In the EAP Identity field, enter an optional identity string to send during the EAP handshake. If left blank, EVE-OS uses the device certificate identity.
- From the Certificate Enrollment Profile dropdown, select the profile you created.
- Click Save Changes.
Enable 802.1x on a New Node During Onboarding
- Log into Edge Infrastructure Services.
- Begin the standard node onboarding flow.
- In the Network Adapters section, locate each adapter that connects to an 802.1x-protected switch port.
- Enable the Enable 802.1x toggle for each of those adapter rows.
- Set the Interface Usage for each adapter as appropriate.
- Click Save & Add to complete onboarding.
Enable 802.1x on an Existing Node
- Log into Edge Infrastructure Services.
- Open Infrastructure > Fleet > Nodes.
- Click the name of the node you want to configure.
- Click the Adapters tab.
- Locate the adapter that connects to the 802.1x-protected switch port.
- In the expanded adapter row, locate the Enable 802.1x toggle.
- Toggle Enable 802.1x to enable it.
- Repeat for any additional adapters.
- Click Save.
Verify the Configuration
On the Nodes list page, the Certificate Status column shows the enrollment state for each node. Expected status values include:- Valid: The device has successfully obtained a certificate from the SCEP server and is authenticated to the network.
- Pending: The SCEP server returned a pending status, meaning the certificate request requires manual approval.
- Enrollment Failed: The enrollment request was submitted but the SCEP server returned a failure.
- Renewal Failed: The most recent renewal attempt failed. The existing certificate may still be valid and active.
- Renewal Pending: A renewal request has been submitted and is awaiting completion.
- Expired: The certificate’s validity period has ended.
- Invalid Configuration: The certificate configuration is malformed or missing required fields.
Next Steps
802.1x Overview
Background on the authentication workflow and certificate bootstrapping model.
Networks Overview
An overview of node connectivity.